Today we will make beads out of paper. Once you finish making the paper beads, you can string them together to create unique necklaces, bracelets, earrings, & pendants! Paper beads are fun to create and make amazing gifts for family and friends! I have even made paper beads with kids in my classroom. Many of my 4 and 5-year-old students were able to roll them up and make them with a little help from the teacher! Younger students can help choose pictures and cut strips. They may need some help rolling the beads up. Either way, it’s a great fine motor skill to practice! Making Paper beads can be environmentally friendly too, when you use recycled paper or magazines that might otherwise be thrown away to create your own jewelry.
Materials
Choose bright and colorful paper if you want your beads to be bold and bright. You can also use bright and colorful images from magazines to make vivid and eye-catching beads, or make some really neat black and white beads by using the text and written parts of the magazine. I prefer to use magazines to make the paper beads because the paper from the magazine pages is thin and is easy to form the beads with. Another reason to use magazines, particularly fashion magazines, is because you can get some really great trendy colors that will make for some nice-looking jewelry.
Choose Your Glue
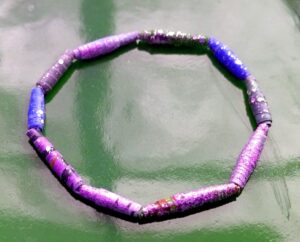
In addition to the paper or magazines, you will need some varnish (clear nail polish works well too) and some tools to measure and cut the paper if you want your beads to all be the same size. You can also substitute the varnish for some plain old Elmer’s School glue (in a bottle, not the stick) if you have that on hand. Your beads will have more of a matte finish if you do it this way but they still look awesome! One more variation that you can try is to paint some glitter nail polish onto the beads to add a little extra sparkle. I tried this and it turned out pretty nice I think (see picture on the left)
Form The Beads
To make the beads shown in the picture, cut long thin acute triangles out of your paper or from magazines pages. The width of the strip of paper should be about 1 inch wide or less and the length should be about 3 to 5 inches. The longer you make the triangles, the fatter the beads will be. The wider you make the triangles, the wider your beads will be.
If you want all of the paper beads to be the same size, you need to cut paper triangles that are all the same size. When I made my beads, I didn’t worry so much about making my beads all the same, so I did not measure the paper before cutting. My beads turned out just fine this way, some were just a little bit longer or fatter.

After you cut out the triangles, arrange them by color. Take one of the paper triangles and paint on a thin layer of varnish or watered down school glue onto it. Roll it up tightly around a nail or round metal skewer to create a hole in the middle, starting with the wide bottom end, and rolling it to the top point of the triangle. Smooth the bead over with your fingers and move it back and forth a little so that it doesn’t stick to the nail or skewer. After about 20 seconds the paper will stick together on it’s own and you can take the completed paper bead off the skewer or pencil and place it aside. Repeat with another triangle and continue to make more paper beads until you have what you need.







Leave a Reply